DIY Home Repairs: 4 Easy Fixes That Save You Over $100 This Year
Anúncios
In today’s economy, every dollar saved is a dollar earned. When it comes to homeownership, maintenance and repairs can quickly add up, often leading to unexpected expenses that strain your budget. However, many common household issues don’t require a professional and can be easily tackled with a bit of know-how and some basic tools. Embracing easy home repairs not only empowers you as a homeowner but also offers significant financial benefits. This comprehensive guide will walk you through four simple DIY fixes that can collectively save you over $100 this year, helping you keep more money in your pocket.
The allure of professional services is understandable – they promise expertise, convenience, and a guarantee of the job done right. Yet, for minor issues, the cost of a service call alone can be exorbitant, often overshadowing the actual repair. Learning to perform these easy home repairs yourself means bypassing these fees entirely. Moreover, it instills a sense of accomplishment and builds valuable skills that will serve you well for years to come. Think of it as an investment in your home and your financial literacy.
Anúncios
Before we dive into the specifics, let’s talk about the mindset. Approaching DIY projects requires patience, a willingness to learn, and a commitment to safety. Always ensure you have the right tools, wear appropriate protective gear (gloves, safety glasses), and if ever in doubt, consult a professional. The goal here is to empower you to handle common issues, not to encourage you to undertake projects beyond your comfort or skill level. With that in mind, let’s explore these four incredibly beneficial and easy home repairs.
Anúncios
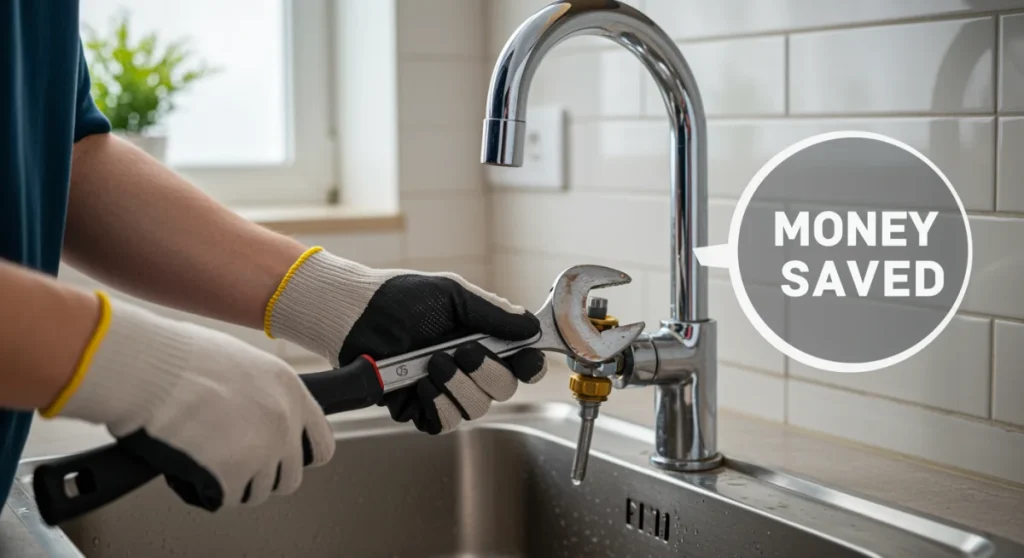
1. Fixing a Leaky Faucet: Stop the Drip, Save the Money
A persistent drip from your faucet isn’t just an annoyance; it’s a silent drain on your wallet and a waste of precious water. Even a slow drip can waste hundreds of gallons of water per year, leading to higher utility bills. Fixing a leaky faucet is one of the most common and easy home repairs you can undertake, often requiring just a few simple tools and replacement parts.
Why Faucets Leak
Most faucet leaks are caused by worn-out washers, O-rings, or cartridges. These components, typically made of rubber or plastic, degrade over time due to constant use and exposure to water pressure and minerals. When they lose their elasticity or crack, they fail to create a watertight seal, resulting in a drip.
Tools You’ll Need:
- Adjustable wrench or basin wrench
- Screwdriver set (Phillips and flathead)
- Pliers
- Utility knife or small flathead screwdriver (for prying caps)
- Replacement washers, O-rings, or a new cartridge (specific to your faucet model)
- Plumber’s grease (optional, but recommended for O-rings)
- Rag or towel
Step-by-Step Guide:
- Turn Off the Water Supply: This is the crucial first step. Locate the shut-off valves underneath the sink (usually two, one for hot and one for cold water). Turn them clockwise until the water flow stops completely. Turn on the faucet to drain any remaining water in the lines.
- Cover the Drain: Place a rag or stopper over the drain opening to prevent small parts from falling down.
- Disassemble the Faucet Handle: Most faucet handles have a decorative cap that hides a screw. Pry off the cap with a utility knife or small flathead screwdriver. Unscrew the handle screw and lift off the handle.
- Remove the Faucet Body Components: Depending on your faucet type (compression, ball, ceramic disc, or cartridge), the next steps will vary slightly.
- Compression Faucets: These have separate hot and cold handles. After removing the handle, you’ll see a packing nut. Unscrew it with a wrench, then pull out the stem. At the bottom of the stem, you’ll find a rubber washer and a brass screw. Replace both. Also, check the O-rings on the stem.
- Ball Faucets: These have a single handle that pivots on a ball joint. Remove the handle, then use an Allen wrench to loosen the screw that holds the cap. Remove the cap, then the cam and packing. Lift out the ball and springs. Replace the springs and rubber seats.
- Ceramic Disc Faucets: These are usually single-handle. Remove the handle, then unscrew the disc cylinder. You’ll find a series of ceramic discs. If they are scratched or cracked, replace the entire disc cylinder. Often, the rubber seals underneath the cylinder are the culprits.
- Cartridge Faucets: These also have a single handle. After removing the handle, you’ll see a retaining nut or clip holding the cartridge in place. Remove it, then pull out the cartridge with pliers. Replace the entire cartridge with a new one that matches your faucet model.
- Replace Worn Parts: Carefully replace the worn-out washers, O-rings, springs, or the entire cartridge with new ones. Apply a thin layer of plumber’s grease to new O-rings for better sealing and smoother operation.
- Reassemble the Faucet: Put all the components back together in reverse order. Make sure all screws are tightened securely, but do not overtighten, as this can damage the new parts.
- Restore Water Supply and Test: Slowly turn the water supply valves back on. Check for leaks around the faucet base and spout. Turn on the faucet to ensure it functions correctly and the drip is gone.
By taking on this one of several easy home repairs, you can save anywhere from $75 to $150 on a plumber’s visit, plus reduce your water bill. It’s a small effort for a significant return.
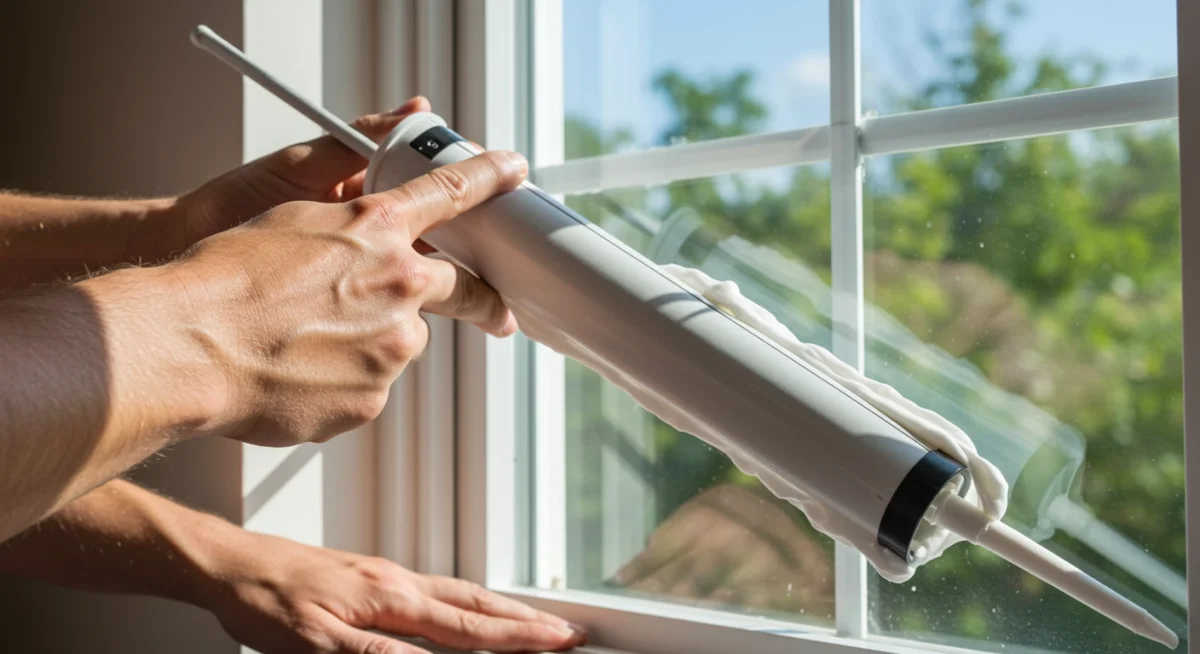
2. Sealing Drafty Windows and Doors: Boost Energy Efficiency
Do you feel a chilly breeze near your windows or doors, even when they’re closed? Drafts are a major culprit for heat loss in winter and cool air escape in summer, leading to higher energy bills. Sealing these gaps is one of the most effective and easy home repairs for improving your home’s energy efficiency and comfort.
Identifying Drafts
The simplest way to find drafts is the ‘hand test’ – just move your hand around window and door frames on a windy day. For a more precise method, light an incense stick or candle and move it around the edges. If the smoke wavers or the flame flickers, you’ve found a draft.
Tools and Materials You’ll Need:
- Caulk gun and exterior/interior caulk (silicone or acrylic latex with silicone)
- Weatherstripping (foam, V-strip, rubber, or felt, depending on the gap)
- Door sweeps or thresholds
- Utility knife or caulk removal tool
- Cleaning supplies (rag, rubbing alcohol, or soap and water)
Step-by-Step Guide:
For Windows:
- Clean the Area: Before applying caulk or weatherstripping, clean the window frame thoroughly to remove dirt, old caulk, and debris. This ensures a good seal.
- Remove Old Caulk (If Necessary): If there’s old, cracked caulk, carefully remove it with a utility knife or caulk removal tool.
- Apply New Caulk: For small, stationary gaps around the window frame (where the frame meets the wall), use a caulk gun to apply a continuous, even bead of caulk. Cut the tip of the caulk tube at a 45-degree angle to create a small opening. Apply pressure evenly as you move the gun. Smooth the bead with a wet finger or a caulk tool for a professional finish.
- Install Weatherstripping: For gaps around moving parts of the window (where the sash meets the frame when closed), weatherstripping is ideal. Measure the lengths needed and cut the weatherstripping to size. Peel off the backing (if self-adhesive) and press it firmly into place along the sash or frame. Ensure it creates a tight seal when the window is closed but doesn’t impede operation.
For Doors:
- Clean and Inspect: Just like windows, clean the door frame and threshold area. Inspect the existing weatherstripping. If it’s cracked, brittle, or missing, it needs replacement.
- Replace Weatherstripping: Most doors use foam, rubber, or V-strip weatherstripping on the sides and top of the frame. Remove the old material and install new, ensuring a snug fit against the closed door. For doors with kerf-style weatherstripping (a slot in the frame), simply pull out the old and push in the new.
- Install or Replace a Door Sweep/Threshold: For gaps at the bottom of the door, a door sweep or a new threshold is necessary.
- Door Sweep: These are typically screwed to the bottom of the door. Measure the door width, cut the sweep to size, and attach it so it brushes against the threshold, creating a seal.
- Threshold: If your threshold is worn or damaged, consider replacing it. This is a slightly more involved task but still manageable for most DIYers. It involves removing the old threshold, preparing the subfloor, and screwing down the new one, often with a sealant underneath.
- Check Door Alignment: Sometimes, drafts around doors are due to misalignment. If the door isn’t closing properly, adjust the hinges or strike plate to ensure a tight fit.
By making these easy home repairs to seal drafts, you can save an estimated 10-20% on your heating and cooling costs, which can easily translate to $50-$200+ annually, depending on your home’s size and local climate. It’s a comfortable improvement with a tangible financial benefit.
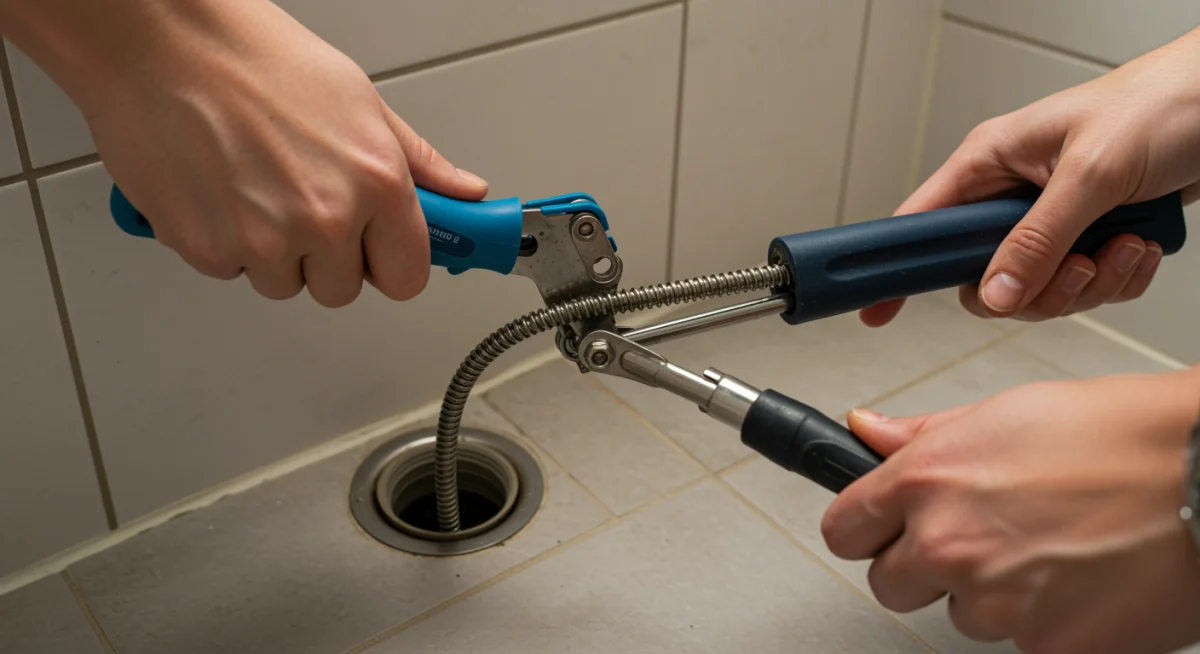
3. Unclogging a Drain: Clearing the Way to Savings
A slow or completely clogged drain is a common household nuisance. While it might be tempting to reach for harsh chemical drain cleaners, these can be damaging to your pipes and aren’t always effective. Calling a plumber for a simple clog can cost $100-$300. Fortunately, unclogging most drains is an easy home repair that you can do yourself with basic tools and methods.
Common Causes of Clogs:
- Bathroom Drains: Hair, soap scum, toothpaste, and sometimes small foreign objects.
- Kitchen Drains: Grease, food particles, coffee grounds, and sometimes mineral buildup.
Tools You’ll Need:
- Plunger (cup plunger for sinks, flange plunger for toilets)
- Drain snake/auger (manual or electric, 15-25 feet usually sufficient)
- Pliers or adjustable wrench (for P-trap removal)
- Bucket (for P-trap removal)
- Gloves
- Flashlight
- Old rag or towel
Step-by-Step Guide:
- Try the Plunger First: For most clogs, a good old-fashioned plunger is your first line of defense.
- For Sinks: Fill the sink with enough water to cover the plunger cup. Create a tight seal over the drain opening with the plunger. If there’s an overflow drain, plug it with a wet rag to maximize suction. Plunge vigorously for 20-30 seconds, then quickly pull the plunger up. Repeat several times.
- For Toilets: Use a flange plunger. Ensure the flange creates a tight seal in the toilet bowl drain. Plunge vigorously.
- Clean the P-Trap (for Sinks): If plunging doesn’t work for a sink, the clog might be in the P-trap (the U-shaped pipe directly under the sink).
- Place a bucket directly under the P-trap to catch water and debris.
- Using pliers or an adjustable wrench, loosen the slip nuts on both ends of the P-trap.
- Carefully remove the P-trap. Be prepared for water and gunk to spill out.
- Clean out any accumulated hair, grease, or debris from the P-trap and the connecting pipes using your hands (with gloves) or a wire brush.
- Reassemble the P-trap, tightening the slip nuts by hand, then a quarter turn with pliers. Run water to check for leaks.
- Use a Drain Snake/Auger: If the clog is further down the pipe, a drain snake (also called a plumber’s snake or auger) is often the solution.
- For Sinks: Remove the P-trap (as above). Feed the end of the snake into the drain opening in the wall. Push the snake forward until you feel resistance.
- For Bathtubs/Showers: Remove the stopper assembly. Feed the snake down the drain opening.
- For Toilets: Use a toilet auger, which is designed to navigate the toilet’s curves without scratching the porcelain.
- Once you feel resistance, rotate the snake’s handle to break up the clog or hook onto it. Slowly pull the snake back out, hopefully bringing the clog with it.
- Repeat as necessary until the water drains freely.
- Flush with hot water to clear any remaining debris.
By mastering this essential one of several easy home repairs, you can avoid costly plumber call-outs and keep your plumbing running smoothly. The satisfaction of clearing a stubborn clog yourself is an added bonus!
4. Patching Small Drywall Holes: Maintain Your Walls
Accidents happen, and small holes in drywall are a common occurrence, whether from moving furniture, removing old fixtures, or just general wear and tear. Leaving them unaddressed can make a room look neglected. Patching small drywall holes is an incredibly easy home repair that significantly improves the aesthetic appeal of your home and costs very little to do yourself, saving you from hiring a handyman.
Types of Small Holes:
- Nail/Screw Holes: From hanging pictures or removing anchors.
- Small Dents/Punctures: From minor impacts.
- Larger Punctures (up to 4-6 inches): These require a slightly different approach but are still DIY-friendly.
Tools and Materials You’ll Need:
- Spackle or drywall joint compound (lightweight spackle for small holes)
- Putty knife or drywall knife (4-6 inch blade)
- Fine-grit sandpaper (150-220 grit)
- Drywall patch kit (for holes larger than 1-2 inches)
- Small piece of scrap wood (for larger holes)
- Utility knife (for larger holes)
- Clean rag or sponge
- Primer (optional, but recommended for a smooth paint finish)
- Paint (matching your wall color)
Step-by-Step Guide:
For Nail/Screw Holes and Small Dents (up to 1-2 inches):
- Prepare the Area: Ensure the area around the hole is clean and free of loose debris. If there’s any protruding paper or drywall, gently trim it with a utility knife.
- Apply Spackle: Using a putty knife, scoop a small amount of spackle. Apply it over the hole, pressing it firmly into the cavity.
- Smooth the Surface: Scrape off any excess spackle with the putty knife, leaving a smooth, flat surface that is flush with the wall.
- Allow to Dry: Let the spackle dry completely. Drying time varies depending on the product and humidity, but typically takes 30 minutes to a few hours.
- Sand Smooth: Once dry, lightly sand the patched area with fine-grit sandpaper until it’s perfectly smooth and blends seamlessly with the surrounding wall. Wipe away any dust with a damp rag.
- Prime and Paint: Apply a small amount of primer (if desired) and then paint over the patched area with matching wall paint. You may need two coats for a perfect blend.
For Larger Punctures (up to 4-6 inches):
These holes are too big for spackle alone and require a drywall patch kit or a more robust method.
- Square the Hole: Use a utility knife to carefully cut the damaged area into a neat square or rectangle. This makes patching easier.
- Method 1: Self-Adhesive Drywall Patch Kit:
- These kits typically include a metal or fiberglass mesh patch with an adhesive backing.
- Peel off the backing and center the patch over the hole, pressing firmly to adhere it to the wall.
- Apply a thin, even layer of drywall joint compound over the entire patch, extending slightly beyond its edges. Feather the edges so they blend with the wall.
- Allow to dry, then apply a second thin coat if necessary, feathering again.
- Once completely dry, sand smooth and paint.
- Method 2: California Patch (for a more professional finish):
- Cut a piece of new drywall slightly larger than your hole (e.g., 2 inches larger on all sides).
- Place this new piece over the hole and trace its outline.
- Using a utility knife, carefully cut along the traced line on the existing wall. This creates a slightly larger, clean opening.
- Now, take your patch piece. On the back, score and snap off the gypsum core about 1 inch in from each edge, leaving the paper facing intact. This creates a ‘flange’ of paper around the patch.
- Apply drywall joint compound to the paper flange on the back of the patch.
- Insert the patch into the hole, pressing the paper flange firmly against the wall. The patch piece should be flush with the wall surface.
- Apply a thin coat of joint compound over the paper flange, feathering the edges.
- Allow to dry, apply a second coat if needed, sand smooth, and paint.
Patching drywall is a highly rewarding one of the more visible easy home repairs. It restores the integrity and appearance of your walls, often saving you $50-$100+ that a handyman would charge for even small repairs.
The Cumulative Savings: More Than Just Money
By tackling these four easy home repairs, you’re not just saving money on professional services; you’re also preventing further damage, reducing utility bills, and enhancing the overall comfort and value of your home. Let’s recap the potential savings:
- Leaky Faucet: $75 – $150 (plumber fee) + reduced water bill.
- Sealing Drafts: $50 – $200+ (energy savings).
- Unclogging Drains: $100 – $300 (plumber fee).
- Patching Drywall: $50 – $100+ (handyman fee).
Conservatively, even choosing the lower end of these estimates, you’re looking at savings of well over $200 this year, potentially much more! These are tangible savings that can be redirected to other important aspects of your life or invested back into more significant home improvements.
Beyond the Financial: The Intangible Benefits of DIY
The benefits of performing easy home repairs extend far beyond the financial. There’s an immense sense of satisfaction that comes from successfully fixing something yourself. It builds confidence, problem-solving skills, and a deeper understanding of how your home works. You become more attuned to potential issues, allowing you to address them proactively before they escalate into costly problems. Moreover, having these skills means you’re less dependent on external services, giving you greater control over your home and your budget.
Building Your DIY Toolkit:
If you’re new to DIY, start building a basic toolkit. You don’t need to buy everything at once, but gradually acquire essential items like:
- Basic screwdriver set
- Adjustable wrench
- Pliers (needle-nose and slip-joint)
- Hammer
- Tape measure
- Utility knife
- Caulk gun
- Plunger
- Small level
- Safety glasses and gloves
These tools will equip you for most of the easy home repairs discussed and many others you’ll encounter.
When to Call a Professional:
While empowering yourself with DIY skills is great, it’s also crucial to recognize your limits. Always call a professional for:
- Major electrical work (beyond changing a light switch or outlet)
- Extensive plumbing leaks or burst pipes
- HVAC system repairs (beyond changing filters)
- Roof repairs involving structural damage
- Any project that makes you uncomfortable or feels beyond your skill level, especially if it involves safety risks.
The goal is to save money on simple fixes, not to create bigger, more expensive problems by attempting complex tasks you’re not qualified for.
Conclusion: Empower Yourself with Easy Home Repairs
Taking charge of your home’s minor maintenance and repair needs is a smart move for any homeowner. The four easy home repairs outlined in this guide – fixing a leaky faucet, sealing drafty windows and doors, unclogging drains, and patching small drywall holes – are excellent starting points. They are manageable, require minimal tools, and offer substantial financial dividends. By dedicating a little time and effort, you can significantly reduce your household expenses, improve your home’s comfort and appearance, and gain invaluable skills that will serve you for years to come.
Don’t let small issues turn into big, expensive problems. Embrace the world of DIY, start with these straightforward fixes, and experience the satisfaction and savings that come with being a proactive homeowner. Your wallet, and your home, will thank you!


